Systeme.io Tutorial for Beginners: Complete Step-by-Step Guide
If you are opening Systeme.io for the first time, the number of tools can make it difficult to know where to begin. Funnels, email campaigns, automation, products, courses and websites all sit inside the same platform.
The easiest way to learn is not to explore every menu. It is to build one small system from start to finish. This guide shows you how to create a page, collect an email address, send a welcome message and test the complete workflow.
Systeme.io is an all-in-one online-business platform. Its main appeal for beginners is that pages, email and automation can work together without several separate subscriptions or complicated integrations. You can start with a free Systeme.io account and follow the steps below.
What Is Systeme.io and What Can You Build?
Systeme.io combines several tools that creators and small online businesses commonly use:
- Landing pages and sales funnels
- Email newsletters and automated campaigns
- Marketing automation rules and workflows
- Checkout pages and digital-product delivery
- Online courses, communities and blogs
- Affiliate-program management
The official pricing page currently lists a free plan with no credit card required. At the time of writing, it includes up to 2,000 contacts, three sales funnels, one blog, one course, one custom domain and limited automation capacity. Systeme.io also lists unlimited email sends, unlimited file storage and no platform transaction fee across its plans. Payment processors such as Stripe or PayPal may still charge their normal fees.
These allowances can change, so confirm the latest limits on the official Systeme.io pricing page before planning a larger project.
Systeme.io Tutorial for Beginners: The Quick-Start Workflow
Your first project should have one measurable result. A useful starting point is a lead-generation funnel:
This workflow teaches the platform’s core relationship between pages, contacts, campaigns and automation. It is small enough to test in one session but useful enough to become part of a real business.
Systeme.io Tutorial for Beginners: What to Prepare First
Before opening the builder, prepare three simple items:
- One audience. Decide exactly who the page is for.
- One useful offer. This could be a checklist, guide, template or short lesson.
- One next step. Decide what a subscriber should do after receiving the resource.
A clear plan prevents you from spending too much time changing templates without knowing what the page must accomplish.
Step 1: Create Your Free Account and Review the Dashboard
Create your account, confirm your email address and complete the basic profile details. You do not need to configure every setting immediately.
Focus on the areas used in this tutorial:
- Sites or Funnels for landing pages and funnel steps
- Emails for campaigns and newsletters
- Automations for connecting an event to an action
- Contacts for checking whether a test subscriber was recorded
Step 2: Create Your First Funnel
Open Sites, choose Sales Funnels and create a new funnel. Give it a clear internal name such as Beginner Checklist Funnel. Choose the option for building an audience when your goal is to collect leads.
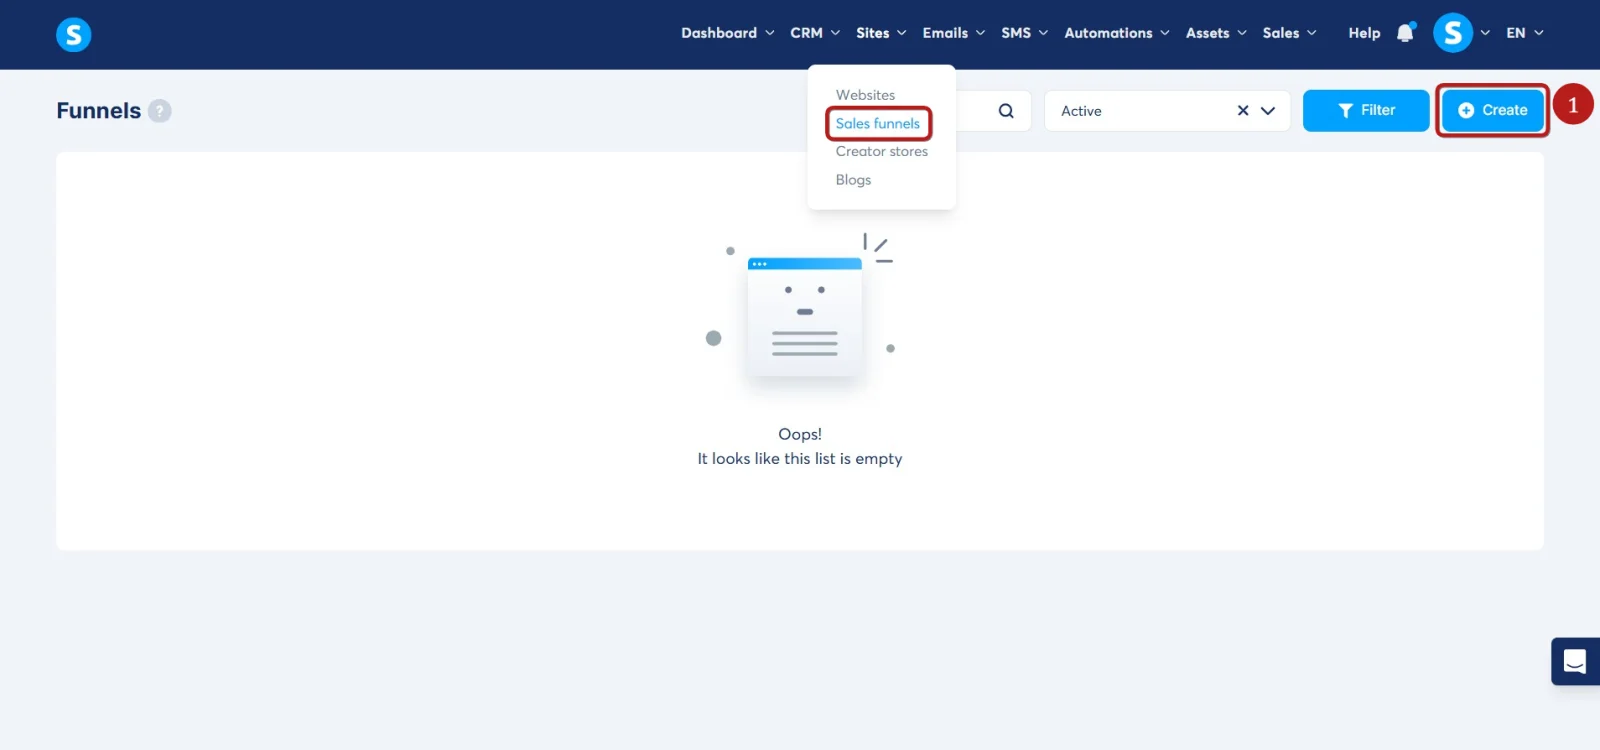
The platform creates the main funnel steps for you. A basic lead-generation funnel normally begins with a squeeze page followed by a thank-you page.
If you want a more detailed walkthrough, read our guide to building a lead magnet funnel for free.
Choose a Template That Matches the Goal
Select a simple template with one main call to action. A visually impressive template is not automatically the best choice. Beginners usually get a clearer result by removing distractions and keeping the page focused on one promise.
For a deeper page-building process, see how to create a landing page without a website.
Step 3: Edit the Landing Page
Open the page editor and replace the template content with your own message. A practical beginner page needs only a few elements:
- A headline that promises one clear outcome
- A short explanation of what the visitor will receive
- An email form
- One visible call-to-action button
Make the button text specific. For example, Send Me the Checklist tells the visitor what will happen more clearly than a generic Submit label.
Review the mobile version before saving. Check headline wrapping, button size, spacing and whether the form remains easy to complete on a small screen.
Step 4: Create a Welcome Email Campaign
Open the email section and create a campaign. Give it an internal name that matches the funnel, then add the first email.
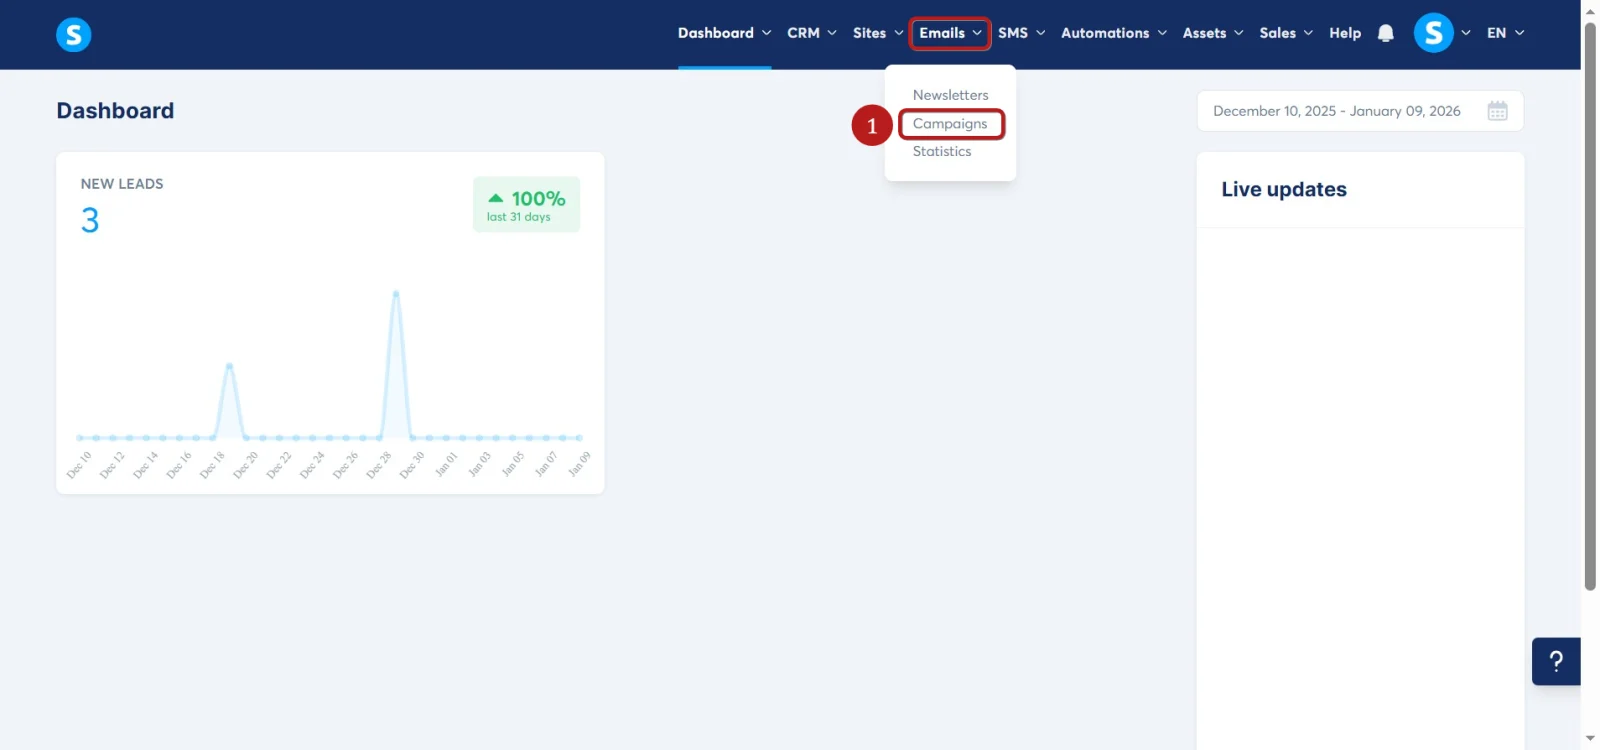
Your first message should do what the landing page promised. Deliver the resource, welcome the subscriber and explain the next useful step. Keep the email short enough that a new subscriber can understand it quickly.
You can expand the sequence later. For the first test, one useful welcome email is better than an unfinished ten-email campaign.
Step 5: Connect the Form to Your Email Campaign
This is the step that turns separate pages and emails into one working system. Open the funnel’s automation rules and create a rule for the form-subscription event.
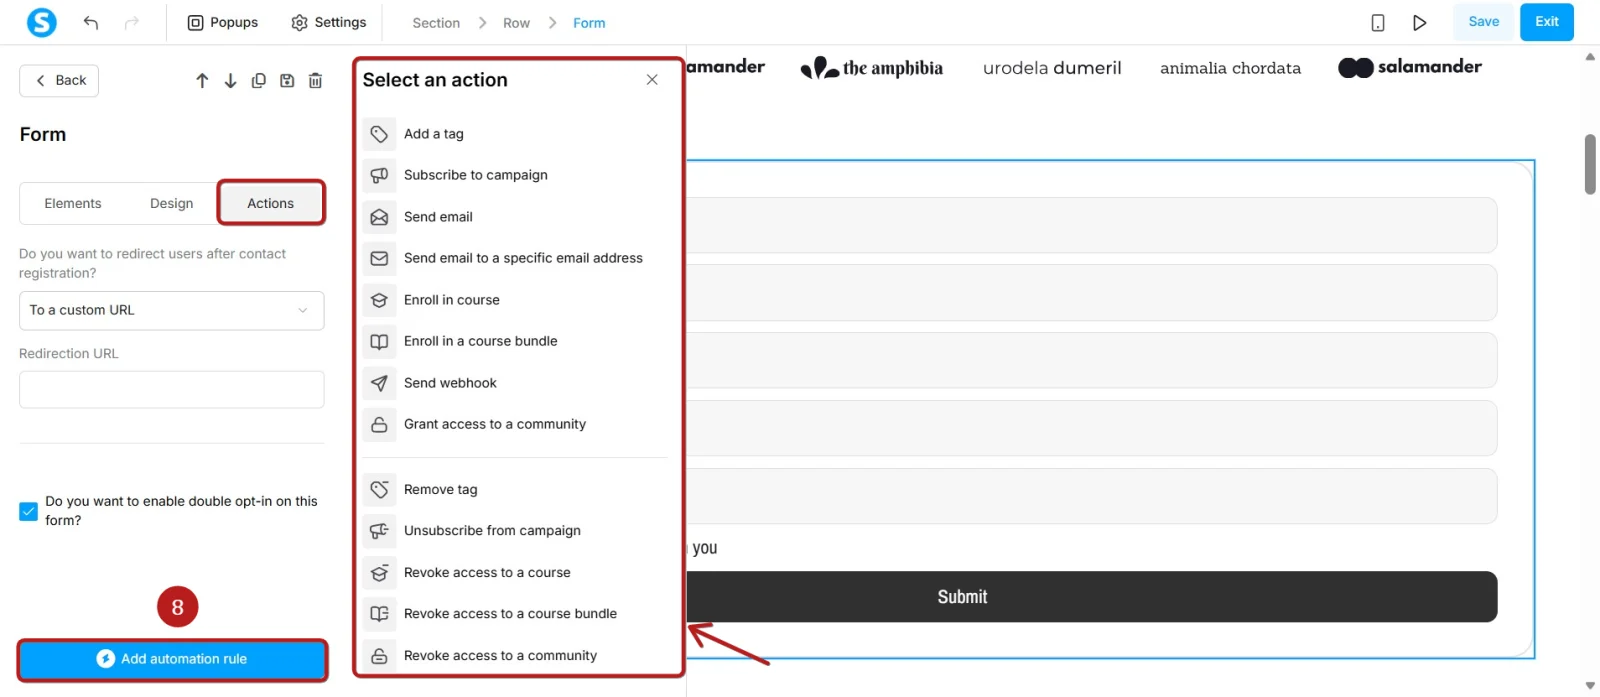
Add an action that subscribes the contact to the campaign you created. If your setup needs to send a single file immediately, the platform can also trigger a direct email action.
Use descriptive internal names. When you later add more funnels and campaigns, names such as Beginner Checklist — Welcome are much easier to manage than Campaign 1.
Step 6: Configure the Thank-You Page
The thank-you page confirms that the form worked. It can also tell subscribers where to find the email and what to do next.
Keep this page focused. You might:
- Ask the subscriber to check the inbox and spam folder
- Explain when the resource should arrive
- Point to one relevant tutorial or product
Avoid adding several competing offers before you know that the core delivery process works.
Step 7: Test the Complete Workflow
Testing is part of the build, not an optional final task. Open the live funnel and submit an email address you control.
- Submit the form. Confirm there is no error and the expected thank-you page opens.
- Check the contact record. Verify that the email address appears in Contacts with the correct campaign or tag.
- Check the inbox. Confirm that the welcome email arrives and every link works.
- Repeat on mobile. Test the same journey on a phone before sending traffic.
If something fails, inspect one connection at a time: form settings, automation trigger, campaign action and email status.
What Real Users Value About the All-in-One Workflow
Positive reviews and official migration stories repeatedly emphasize the convenience of keeping funnels, email, automation and product delivery in one dashboard. These sources include different types of users and should not be treated as a guarantee of identical results.
The practical benefit is simpler: fewer separate tools can mean fewer integrations to configure and fewer accounts to troubleshoot. For a beginner, that may reduce technical friction and make it easier to understand how each step connects to the next.
A useful beginner platform should make the first complete workflow easier to understand, not encourage you to activate every feature at once.
TechWorthFinding takeaway: Use the all-in-one structure to finish one working path first. The value comes from connecting the pieces clearly, not from collecting the largest possible feature list.
Common Beginner Mistakes to Avoid
- Building too many pages before testing. Complete one path before expanding it.
- Using vague internal names. Name funnels, campaigns and rules according to their purpose.
- Ignoring mobile layout. Test the actual form and button on a phone.
- Forgetting email authentication. Follow current official deliverability guidance before sending important campaigns.
- Assuming the free plan is unlimited. Check current limits before designing a larger system.
- Adding advanced automation too early. A simple verified rule is more useful than a complex untested workflow.
Where to Go After Your First Funnel
Once your lead-generation workflow works, choose the next project according to your business goal.
- If you want to accept payments and deliver files, learn how to sell digital products without building a website.
- If your first product is a guide, follow the tutorial for selling an ebook without a website.
- If audience growth is the priority, improve the opt-in offer and extend the welcome campaign one email at a time.
Do not add tools simply because they are available. Add the next page, email or automation only when it supports a clear reader or customer journey.
Final Thoughts
Systeme.io becomes easier to learn when you treat it as a connected workflow instead of a collection of menus. Start with a landing page, collect one contact, trigger one email and test every step.
That small project teaches the core relationship between funnels, contacts, campaigns and automation. From there, you can expand into digital products, courses, blogs and more advanced sales funnels with a much clearer foundation.
Ready to Build Your First Systeme.io Workflow?
Create your free account, follow the tutorial and test one complete funnel before adding more complexity.
Suggested Articles to Read
 Want to Sell an Online Course Without Building a Website?
 Want to Sell an Online Course? Here’s the System You Actually Need
 Systeme.io vs WooCommerce: Which Is Simpler for Selling One Digital Product?
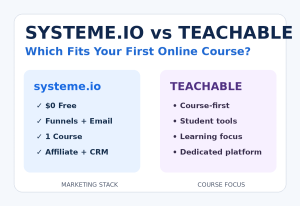 Systeme.io vs Teachable: Which Is Better for Selling Your First Online Course?
 Systeme.io Review: Is It Worth It for Beginners in 2026?